Monday, August 16, 2010

Hummus


I remember before I had actually tried hummus thinking that it looked so delicious and smelled so good that it couldn't be anything else. Well, the first time I tried commercial hummus I was very disappointed. It was so sour that my mouth was unhappy and the wonderful garlic smell didn't translate to a wonderful garlic taste. So I developed a recipe with a lot less lemon juice and a lot more garlic. And now my mouth is happy.

Hummus
2 - 14.5 ounce cans garbanzo beans, drained, liquid reserved
1/2 - 3/4 cup tahini
3 tablespoons minced garlic
1/4 cup olive oil
juice of 1/2 lemon
sea salt, to taste

Puree garbanzo beans in a food processor or blender with a little of the reserved liquid until smooth. Add in tahini, garlic, lemon juice and salt. Process until well incorporated. With food processor running slowly pour in olive oil. Taste for seasoning and adjust if needed.

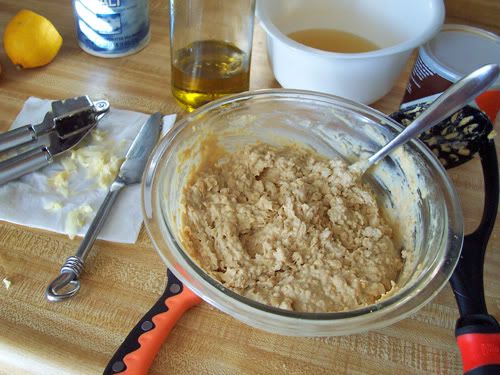
And that's how I would have made it if my blender had not frizzed on me. As you can see by the photo, I ended up using my potato smasher and a fork to do the work of the blender. This obviously made a more chunky hummus, but it still tasted great. The recipe above is also just the base that I use. While it is a very traditional hummus, I prefer mine very creamy so I add sour cream and cream cheese...and more olive oil. While it won't garner any brownie points with people who love real hummus, it's so fabulous on pita or bagel chips it's almost a sin.

On a side note: garbanzo beans, whether canned or rehydrated from dry, have a tough casing on them that I don't care for in my finished hummus. I remove it very easily by just popping the bean out of it. A tedious job it may be, but a smoother product it will yield.



Saturday, August 14, 2010

I Am A Cheesewhore


Every Sunday my best friend and I meet up at the university library to work on our on-going book project. The library has these really great rooms on the 5th floor that bring in a lot of light, have large tables, comfortable chairs and even one with a pc. If we're having a particularly good session we can end up staying for 3+ hours. Working our creative brains for that long means we get hungry....really hungry. Since we're allowed to bring food and drinks into the library, we usually bring special "snacks", alternating Sundays.

Last Sunday I brought in green onion cream cheese with everything bagels, among other things. Since I have yet to attempt bagels from scratch, I made the cream cheese. And it was insanely easy. The best part, though, was that after I mixed it all together and it mellowed for a few hours, it tasted really close to a mixture of pepper and garlic-herb Boursin. Oh happy days for the cheesewhore.

Green Onion Cream Cheese
8 ounces cream cheese, room temperature
2 green onions, thinly sliced
1 teaspoon freshly minced garlic
1/2 - 1 teaspoon freshly ground black pepper, to taste
1/4 teaspoon salt

Mix all ingredients together in a small bowl, cover with plastic wrap and refrigerate for at least 3 hours, but over night is best. Take out about an hour before you want to serve so that it comes back to room temperature.

Friday, August 13, 2010

You Don't Call, You Don't Write...


It's been a while, but sometimes life will intrude on the things you want to do in your spare time. Well, I'm back now and with a super delicious recipe to warm you up. Ok, that's probably not what you want at this time of year in the Northern hemisphere, but that's what you get...deal with it.

When we lived in Washington state just outside of Tacoma, my sister introduced me to this little bitty place called Bangkok Thai....and therein we did have some of the best Thai food we've ever had. It was so good, it became our guilty pleasure. And while they had quite an extensive menu of delectable treats, she always ordered the Pad Thai and I always ordered the Red Curry Chicken, which we would share because the portion sizes were family style. We'd also share an order of Thai Spring Rolls, but I can't talk about them now because this isn't that kind of blog.

I haven't had either dish at any other Thai place that I liked better. However, I have tried a few times to make Red Curry Chicken that tasted close to it....and last week I finally succeeded. There were shouts of joy and a few tears were shed. Just to note before you even get started on this one, you can adjust the amount of the red curry paste that you add. Adding the full amount I listed is akin to number 3 or 4 on a Thai restaurant's "How Badly Do You Want To Burn Your Mouth" o'meter.

Red Curry Chicken
3 chicken breast halves, very thinly sliced
1 medium bell pepper, julienned
2 carrots, very thinly sliced
1 cup fresh green beans, trimmed
1 - 8 ounce can bamboo shoots, drained
4 - 13.5 ounce cans coconut milk
1 - 4 0unce can red curry paste (I use Maesri brand)
2 tablespoons canola oil
chilli paste with sweet basil leaves (optional)

In a small stock pot heat the oil and fry the curry paste for about 3 minutes. Add the carrots and cook for about 2 minutes more. Add the green beans and cook for about 2 minutes more. Add the bell pepper and cook for about 3 minutes. Add the coconut milk and stir to combine. Add the chicken breasts and bamboo shoots, cover and simmer until chicken is cooked through. Stir in chilli paste to taste or, if you can find it, about 2 tablespoons of Thai basil. Serve over jasmine rice.