Tuesday, November 29, 2011

C is for cookie, that's good enough for me!


After finally giving up on Thanksgiving leftovers, I have decided that it's time for me to start work on the long list of Christmas cookies for this year.  These lovely jam sandwich cookies have been on my list every year that I've been on my own and were made every year that I can remember either by my mother or my Oma when I was growing up.  Surprisingly, I don't have their recipe for these and quite frankly can't remember ever seeing one.  Instead I use a recipe from The Best of Baking which is absolutely amazing and tastes just like theirs.

Austrian Jam Rings
2 2/3 cups flour
3/4 cup plus 2 tablespoons butter
3 egg yolks
1/2 cup sugar
2 tablespoons vanilla sugar
grated peel of one lemon
1/2 cup finely ground hazelnuts
1/3 to 1/2 cup jam (red currant, seedless raspberry, or the like)
powdered sugar

Put flour in a large bowl and cut in butter.  Make a well in the center of flour mixture and add in egg yolks, sugars, lemon peel and hazelnuts.  Knead all together until dough sticks together and can be formed into a disk (if the dough is not coming together gently knead in another egg yolk).  Wrap in plastic wrap and refrigerate for 2 hours.

Preheat oven to 400 degrees and line two baking sheets with parchment paper.  Roll out dough 1/4 inch thick on a floured surface.  Using a round, fluted cookie cutter approximately 2 1/2 inches in diameter, cut dough into rounds.  Using the the clean top of a round lipstick tube (hey, don't laugh, it's the best thing ever), cut a hole in the center of an even number of those rounds.  Use a spatula to move the rounds and rings to the baking sheets.  Bake for 10 minutes, or until browned.  Remove from sheet and place on a wire rack to cool completely.  Repeat with remaining dough.

Using the tip of a butter knife, place about 1/2 teaspoon of jam in the center of a round.  Top it with a ring and press slightly together.  Repeat with remaining rounds and rings, lining them up on a wire rack.  Heavily sift powdered sugar over the tops of the cookies.  Let sit until powdered sugar is absorbed by the jam in the middle of the cookies.  Store in an airtight container.

a note on filling:  If you use red currant, don't use jelly.  You really need the jam to get the correct flavour and texture.  If you can't find red currant then I would suggest seedless raspberry or if you have homemade jams, any tangy red jam will work beautifully. 


Sunday, November 20, 2011

The Real Sugar Plum


I am a big proponent of traditional foods on holidays, but I always try to add in some new things here and there to make it interesting.  If the thought of having only the same pies for Thanksgiving this year makes you feel like you're stuck in a rut, give this plum cake a try.  Not only is it still very fallsy, but it's refreshing, surprisingly light and can be prepared a day in advance.  In fact, it's actually better the next day.

Coming from a German background has given me a great appreciation for "peasant" fare; hearty, simple, and using the foods available during the season.  This is one of those type of dishes.  The plums that are used for this dish are called Italian prune plums in the few stores that I've been able to find them in here, but where I come from in Germany (Rheinland-Pfalz) they're called Quetsche and they are a staple fruit during the tail end of summer and throughout fall.  My Opa used to make Slivovitz, a Slavic plum brandy, with them and my Oma made Latwerg, an extremely thick plum butter that needed to cook for three days.  My mother and I still make the Latwerg, but sadly we never did get to see my Opa make the Slivovitz.  On the day of my graduation my mother presented me with a bottle that he had put up the year I was born.  It was amazing....but could burn the hair off a rhino at 20 paces.  The only one brave enough to have a second shot straight after the first was my sister, and she couldn't speak above a hoarse, raspy whisper for a few hours afterward.   I don't think I have ever mentioned this before, but I am so glad I have the heritage that I do, it is amazing.

This recipe makes three 10 inch cakes so adjust according to your needs.

Quetschekuche
dough (adapted from a recipe in The Best Of Baking):
1/2 cup sugar
1 cup warm milk
2 packages active dry yeast
4 2/3 cups flour
1 teaspoon salt
8 tablespoons butter, melted and cooled
4 eggs
canola oil

topping:
9 pounds Italian prune plums
granulated sugar

For the dough:
Mix sugar and yeast with warm milk (between 110 and 115 degrees) and set aside to proof for 5 minutes.  Meanwhile, at the Hall of Justice....uh, oops, this isn't my Useless Superheros slash page....mix flour and salt together in a large bowl.  Heat oven to 220 degrees and turn off heat.  Stir cooled butter and eggs into yeast mixture and pour liquid ingredients over flour mixture.  Bring together into a ball, adding flour if too sticky.  I made this on a fairly humid day and ended up adding about another 3/4 cup of flour before a nice soft dough was achieved.  Knead briefly into a smooth ball.  Place ball in an oiled bowl, spread a little oil on the top, cover with plastic wrap and put dough into preheated oven to rise.

For the topping:
While the dough is rising it's time to get your plums prepared.  I forgot to take pictures of this process so I'll try to explain it for anyone who has never done it like this.  Hold the plum with the stem side up, seam towards you.  Using a sharp paring knife cut along seam until the plum is cut down one half.  Carefully open, like you would a book, without tearing uncut half.  Slide the tip of the paring knife between one side of the pit and the plum if it doesn't want to come loose on its own.  Remove pit.  At stem end, cut about a third of the way down on the uncut side to more easily open the plum.  Make two slashes about a third of the way down on each plum half to produce the characteristic points seen in the picture.  Repeat with remaining plums.

Lightly grease three round 10 inch tart pans.  Remove risen dough from oven and preheat to 350 degrees (if you are using dark tart pans, reduce the heat of your oven to 325).  Punch down dough and separate into thirds.  Press each third evenly into each of the tart pans.  Starting from the outside, lightly press prepared plums into dough in concentric rings, points facing up.  Sprinkle liberally with sugar.  Bake for 25 to 30 minutes, or until dough is golden and plums are a little wilted.  And don't worry if you have a "plum juice puddle", it's perfectly normal.  It will be reabsorbed by the plums as well as the now golden dough without making the cake soggy.  Sprinkle a little extra sugar over the plums as the cakes cool.  Cool completely and serve at room temperature. 

Saturday, November 19, 2011

What's up, Doc?


When I was growing up I really didn't like carrots that were cooked.  They were mushy and pretty bland all around.  It's not that my mother didn't cook well, quite the opposite in fact, I just never remember her cooking carrots in any way that was good.  As I got older I began experimenting with my cooking and soon put together my first "gourmet" meal - Chicken Cordon Bleu, Potatoes Gratin, and Carrots Vichy.  To this day I don't know why I chose that recipe for carrots as my vegetable, but boy am I glad that I did.  I can't recall preparing cooked carrots any other way since that day.

What is also really great about this preparation method is that people who don't normally like carrots at all (let alone cooked) tend to eat these like they're going out of style whenever I make them.  And they make a great alternative vegetable for corn on Thanksgiving.

Carrots Vichy
3 pound bag of baby carrots
1-2 sticks unsalted butter
1/4 cup chopped fresh parsley or 2 tablespoons dried parsley
salt to taste

Melt 1 stick butter in a large, high sided pan (I use a chicken frying pan that has 3" sides and is about 18" in diameter).  Add carrots and flip to coat.  Do this by flipping them in the pan as you would for pancakes, don't actually use a utensil to stir or otherwise move them around.  If the carrots are not well coated and a nice bit of melted butter is not left in the pan, add as much as needed of the second stick of butter to achieve this.  Place a well fitting lid on the pan and cook over medium low heat until carrots are tender.  Make sure to flip every once in a while.  Once they are tender, uncover, sprinkle with salt to taste and turn up the heat to medium high.  Cook the carrots, flipping often, until they are browned and caramelized in spots.  Sprinkle parsley over during the last 10 minutes of cooking. 
 

Not A Happy Camper


My latest foray into achievements in WoW has me camping out in The Storm Peaks which is snowy enough to make me feel cold just by going there.  What am I camping for, you might ask?  The Time-Lost Proto Drake.  This is an extremely rare dragonkin who flies around just asking to be killed because he drops reins that let you get him as a riding mount.  The frustrating part of camping for him is that there is no pattern to his spawning.  He could spawn three times in one day or not spawn at all for three weeks.  Yesterday I camped for 14 hours with WoW in the background and listened for my SilverDragon to go off while I worked on homework.  As I was on my last question for my discussion board, I was concentrating so much on my answer that I didn't hear SilverDragon.  I finished my answer and posted it then flipped back to WoW and found the Time-Lost plate up on my screen and realized I had just missed him flying by.  I swooped down the mountain only to find that a douche on the server named Nish, who had seen me camping, had stolen the kill out from under me by about 30 seconds.  It's not that Nish needs this mount by the way, he's killed it at least three times.  The first time he did he stole the kill from a guildie of mine who had also been camping him and had him marked already.  No, Nish killed it just to be an ass because he knew I was tabbed out.  He even said so to another guildie of mine who was online at the time.  I'm not ashamed to say that I was extremely put-out, frustrated and very unhappy.  So now I sit here and camp some more because Seph loves green mounts and TLPD is olive green.

Oh, and Nish, if you read this, thanks for proving everyone on the server right about your character.

Cucumber Salad +10 Intellect


I took the turkey out of the freezer and put it into the refrigerator a couple of days ago and it's still pretty frozen.  Which means that I can't post about brining it until Sunday at the earliest.  In the meantime, let's talk about side dishes for Thanksgiving.  Salad is a definite need on our table.  In fact, we usually have two or three kinds.  One of the best ones is my mother's cucumber salad.  It's fabulous for Thanksgiving and fantastic any time of the year.  I have converted many people over to the cucumber side of the road with this one.  It's so good we even drink the dressing that's left in the bowl.  Seriously.

Mrs. B's Cucumber Salad
3 large cucumbers, peeled
2 cups sour cream
1/4 - 1/2 cup vinegar
2 - 3 cloves garlic, minced
1 tablespoon sweet Hungarian paprika
salt to taste

Slice the cucumbers thinly using a mandolin (or if you're gadget-heavy like me, with your Salad Shooter) into a large bowl.  Sprinkle them with about a teaspoon of salt, toss in the sour cream, vinegar, garlic and paprika.  Stir the whole mess together with a wooden spoon until well combined and little bubbles have formed in the sauce.  Let it rest for about five minutes.  Taste it for paprika and salt and add if needed.  Serve and try not to slurp the dressing when you have the bowl to your mouth.

And yes, you have to use a wooden spoon to mix it...because my mother says so.
   

Thursday, November 17, 2011

π


After a few months of taking care of too much stuff in real life, I am finally back to post more recipes and occasionally talk about World of Warcraft (just to put it out there, I hate Baleroc).

Thanksgiving is right around the corner and as we have done the past few years, we're going to celebrate with my BFF Jill and her family.  This means copious amounts of food and Harry Potter.  This year's Harry Potter aspect will consist of watching The Deathly Hallows.  Though it hasn't been mentioned, I'm pretty sure it'll be a viewing of both parts.

The food aspect is much more involved.  Both April and I do the cooking and this year's list is staggering; turkey, turkey gravy, turkey noodles, ham, dressing, mashed potatoes, sweet potatoes, potato salad, roasted asparagus, corn, cornbread biscuits, cranberry relish, and anything else that April added to her stuff that I didn't have on my Big List.  And those are just the things for dinner.  We're also doing appetizers and desserts.

With desserts come the pies.  This year I'll be making pecan pie, chocolate tart pie, and the ever ubiquitous apple pie and pumpkin pie.  Today I'm going to share the recipes that I use for these last two because the apple pie is, well, perfect, and I finally perfected the pumpkin pie (which was quite by accident).

Old-Fashioned Apple Pie (From Martha Stewart Living, November 2005)
4 pounds cooking apples, peeled, cored and cut into wedges
3 tablespoons lemon juice
5 tablespoons flour
1/2 cup sugar
1 1/4 teaspoons ground cinnamon
1/4 teaspoon ground nutmeg
1/4 teaspoon salt
1/4 cup unsalted butter, cut into small cubes
1 egg yolk
1 tablespoon half and half
sugar, for dusting

Preheat oven to 400 degrees.  In a large bowl toss apple wedges with lemon juice and set aside.  In a small bowl mix together flour, sugar, cinnamon, nutmeg and salt.  Sprinkle flour mixture over apples in thirds, tossing after each addition.  Fill one deep dish or two regular 9-inch pie shells evenly with apple mixture; dot evenly with butter.  Whisk together egg yolk and half and half, brushing rim of pie crust.  Take top crust and drape over filled pie shell.  Brush top of crust with egg wash and press over hanging crust up to form a rim.  Cut four slits into the top crust to allow venting.  Sprinkle top with sugar.  Bake pie for 20 minutes at 400 degrees and then turn heat down to 350 and bake for a further 35 minutes. 

Pumpkin Pie
1 - 4 pound sugar pumpkin, roasted and flesh mashed*
3 large eggs
1 1/4 cups packed brown sugar
3/4 teaspoon salt
1 teaspoon ground cinnamon
1 teaspoon ground ginger
1/4 teaspoon ground nutmeg
3/4 teaspoon pure vanilla extract
1 cup heavy cream

Preheat oven to 350 degrees.  In a large bowl carefully whisk together all ingredients listed until thoroughly combined.  Pour mixture evenly between 2 deep dish pie shells.  Bake for 35 to 40 minutes or until centers are almost set.  Cool completely before serving.

Just as a side note, I did not make my own pie crusts.  I used frozen deep dish crusts for each pie and then picked up a package of rolled pie crust for the tops of the apple pies.  I'm just like that sometimes, and pie crust and I have never really seen eye-to-eye in the first place.  You can make your own, if you're so inclined.

*You can use 4 cups of the canned solid pack pumpkin in place of the mashed pumpkin, but if you decide to mash it yourself, here's how to do it:  Cut the pumpkin in half with a large knife.  Scoop out seeds and place halves cut side down onto a tinfoil lined baking sheet.  Roast in a 350 degree oven for about an hour to an hour and a half.  The outer shells will have a bit of give to them when they are ready.  Remove from the oven and turn cut sides up.  Allow pumpkin halves to cool completely then scoop out flesh and either puree in a food processor or take the less advanced method and mash it with a potato masher.  Either one works well. 

Wednesday, August 24, 2011

The Chicken in my Pot


I know, I know...where the hell have I been the last month and a half??  It'd be a lie to say I was out being Superwoman or even so swamped with every day life that I didn't have a chance to post.  What really caused my absence was my inability to take photographs either a) because I was cooking dinner at midnight, or b) because I have some seriously bad juju when it comes to actually photographing my foodstuffs during daylight hours.  I know I've lamented this last point more times than I can count, but dammit man, I could have robotic arms perched on a stable surface and STILL manage to have all the pictures turn out blurry.  It's like I have Parkinson's, but only in my arms.  I swear, I'm buying a tripod as soon as I have an extra $20 burning a hole in my pocket.

About the dinner at midnight thing, my sleep cycle is soooo distorted at the moment that I truly am sleeping during the daytime like I worked 3rd shift somewhere.  And while I have had one or two night time pictures turn out acceptable, 99% don't.  Coupled with the shaking-like-a-leaf-in-a-hurricane arms I have, none of the pictures that I did attempt turned out.  I can't even imagine if I were doing this before the digital camera age.

So.Much.Wasted.Film.  

Needless to say, I have been cooking, and I have been cooking well.  From the best ribs I've ever made to bundt cakes that melt in your mouth, it has been gastronomic bliss.  There were a couple of missteps (like the Millionaire's Shortbread that would have been divine had I followed my instincts and not baked the shortbread for as long a time as the recipe called for) and fumbles, but overall, good times with food here.

One of the things in the "absolutely completely shot it out of the park" category was the humble chicken soup you see pictured above.  I think the kids said "omg mom, this the best chicken soup ever" every time they took a bite.  It was inspired by a recipe Karina and I found at Beyond Kimchee.  It looked so good and sounded even better that we adapted it for what we had on hand.  Thankfully I wrote down what I did so that I'll be able to make it again.

Best Chicken Soup
12-16 cups stock
1 whole 3 1/2 pound chicken
1 cup thinly sliced carrots (about two medium)
2 cups shredded cabbage
3-4 cups frozen corn 
1 16 ounce package frozen chopped collard greens
1 medium onion, chopped
3 cloves garlic, minced
3 tablespoons olive oil
kosher salt, to taste

Place chicken in an 8 quart stock pot and cover with stock until just submerged.  Cover loosely with a lid and simmer chicken over medium heat for approximately 1 hour.  You want your bird tender, but not disintegrated.  Remove whole, cooked chicken to a bowl and place in the refrigerator until cool enough to handle.  Strain the stock into a clean pot and bring to a low boil.  Add in carrots, cabbage, corn and collard greens.  While vegetables are heating and getting al dente, heat the olive oil in a small sauce pan.  Saute the onion and garlic until translucent and softened.  Stir into the soup.  Remove the meat from the cooled chicken and shred with your fingers into bite sized pieces.  Add chicken to the soup and heat through.  Taste for seasoning and add if needed.  I was very fortunate and only needed 1 tablespoon of kosher salt for the entire pot.  I used homemade stock that had been lightly seasoned when it was made, so that may have made a difference, not to mention the fact that the chicken itself was cooked in the stock, adding even more flavor to an already flavorful base.

Serve with crusty bread while hot off the stove.

Sunday, July 10, 2011

I’m hungry. Let’s get a taco.


When we grocery shop, it's usually one large trip at the beginning of the month with one or two small ones thrown in for stuff like milk, bread and eggs.  While this is a good thing, what inevitably ends up happening is that the last week and a half or so of the month we have a little of this and a bit of that, and none of it adds up to a meal.  Which, in our book, sucks.  Towards the end of last month I got to thinking that if I had some idea of what the kids might want for dinners in July, we'd be able to shop more efficiently and make sure that we had good meals all month.

This little idea exploded into a list of 15 meals, with desserts, that were spread out evenly over the 31 days of July.  I can't even express how fantastic this has been so far.  No standing in front of the fridge or pantry trying to decide what to cook, or trying to figure out if all the ingredients needed for a specific dish just happen to be lying around.  Granted, this does mean that I can't really be spontaneous with meals, but since we chose a really diverse group of meals, I'm not too worried about spontaneity.

And one of the other great things about this is that it was easy to do.  I get a meat package from Jaworski's Meat Market every month.  Sometimes it's the #2, sometimes the #3, and if I have enough to spare, I go for the #5.  Knowing which meat package I was going to get this month allowed Karina and I to plan meals based on the meat we knew we would have on hand.  Then I got kind of crazy and typed up the grocery list in Word, organized the items into groups (with headings), and printed out the list.  Karina rolled her eyes at me...she's the list holder when we shop.  On the other hand, she's the one who organized the meals/desserts list you see above and put the meal numbers on the calendar.

Our first real "planned" meal was for the 4th:  a host of finger foods and an awesome dessert table.

stuffed mushrooms, hungarian sausage bites, assorted chips, pickled vegetables, various dips, deviled eggs, olives, dilled green tomatoes, fresh vegetables, mozzarella sticks and jalapeno poppers
  
a cake-which-cannot-yet-be-named, mocha cream filled puffs, black forest cherry cake, banana pudding, and strawberry cheesecake trifle
Seeing these pictures has once again reminded me that I am not a photographer, not even of the amateur variety.  I think I'll be taking a digital photography class as one of my electives while I go to culinary school.

Saturday, July 2, 2011

Lemarchand's Box

I've previously mentioned my penchant for getting achievements in WoW, and as you can see by the little indicator bars on my achievement screen I have over 75% completion in all areas...except one.  Player vs. Player (hence forth to be known as PvP).  This category makes me cry and it shows in my abysmal numbers; 32% completed.

I just don't PvP well.  I usually die 20+ times in any given battleground...even when I'm in full PvP gear with a good PvP spec.  Yet, I still torture myself every once and a while and throw my poor shaman into them.  But arena?  Don't even get me started:

  
Arenas are where you form a team with either 2, 3 or 5 players and then proceed to beat the shit out of other teams of 2, 3, or 5 players.  I have one, just one, achievement in arena.  I was delusional enough over two years ago to create two teams (2v2 called Sadistic Ponies and 3v3 called Not Illegal In Denmark) and then actually go into arenas with a couple of brave souls...and we won one of those arenas, for which I got an achievement.  I haven't been back since then.  Why?  Because it took 50+ arena matches to win that one.  Now you know why I cry.

Unfortunately this is the area where I will next need to concentrate my efforts if I am to maintain my achievement desires.  I wonder if drug addicts feel this way, willing to substitute their drug of choice with something they know isn't good for them just so they can satisfy their habit. 

Monday, June 27, 2011

Daring Bakers' June 2011 Challenge - From Phyllo to Baklava


Erica of Erica’s Edibles was our host for the Daring Baker’s June challenge. Erica challenged us to be truly DARING by making homemade phyllo dough and then to use that homemade dough to make Baklava. This challenge was easy and hard all at the same time.  

I've been making baklava since I was 13 or 14 years old.  My mother brought home a Greek cookbook that had been translated into English and I was the first one to make it from there.  The rest is history.  Baklava has since become one of my most requested dishes. Given that, I found the challenge easy because I knew what to do, what to expect and what to look for.

The hard part, of course, was making my own phyllo.  Phyllo, for those who don't know, is a paper thin sheet of raw dough.  The commercially produced phyllo can be difficult to work with because it dries out quickly and can crack or tear.  Homemade phyllo has about a hundred more difficulties on top of those.

Let's talk about those, shall we?

Thursday, June 23, 2011

Let Them Eat More Cake


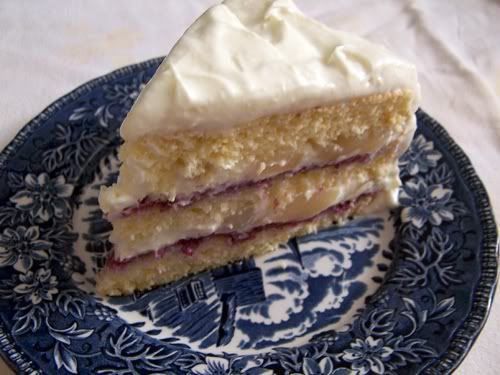
Brendan came home last weekend and a few days before hand Karina had decided he needed a cake since his birthday had been on the 15th.  She leafed through *The Best of Baking (the one cookbook we couldn't live without) and hit upon their Pear Cream Gateau because it had a nice light whipped cream instead of heavy butter cream.  It's as hot as the Sun here and with the added beauty of high humidity, the heat index is the like standing on Rigel.  Just saying butter cream made us both feel sluggish.  Plus, pears...pears are juicy, bright, and just the right sweetness for hot weather.

Back to the recipe.  It called for a chocolate cake to be made, which Karina nixed right off the bat.  She was unable to match chocolate with pears in her mind.  No problem, I said, I'll just make a regular sponge.  Then I started getting out all the ingredients I'd need otherwise, only to find I didn't have any blueberry preserves (which she wasn't too chuffed about either...pears, blueberries and chocolate do not live together in her culinary world), so I pulled out black currant preserves instead.  I whipped up the cake, put it in the oven and went to whip up the cream with a little powdered sugar.  As I was pulling the cream out of the fridge, I spotted a package of cream cheese and my brain said, "oh yeah, that dog'll hunt."  I pulled it out, softened it in the microwave, added some powdered sugar and extracts, and folded the whipped cream into the whole mess.

Which is how we ended up with a cake that merely resembled the original because it had pears in the filling.

Pear Cream Cake
sponge:
6 eggs, separated
4 1/2 tablespoons lukewarm water
2/3 cup sugar
1 3/4 cups cake flour, sifted
1 1/2 teaspoon baking powder
1/8 teaspoon salt
1 teaspoon grated dried orange peel

filling and frosting:
2 15-ounce cans pears, drained with juice reserved
2/3 cup black currant preserves
2 cups heavy cream
1/4 teaspoon brandy extract
1/4 teaspoon pure almond extract
12 ounces cream cheese, room temperature
1 - 1 1/2 cups powdered sugar

Grease a 9-inch springform cake pan.  Preheat oven to 365 degrees**.

Place the egg yolks, water and half the sugar in a medium bowl.  Beat with an electric mixer for 5 to 10 minutes or until pale and creamy.  Beat the egg whites until stiff and fold in remaining sugar.  Carefully fold egg white mixture into egg yolk mixture.  Sift together the flour, baking powder and salt, then stir in the dried orange peel.  Fold flour mixture into egg mixture.  Turn the batter into the prepared pan.  Smooth the surface and bake for 30-35 minutes or until a wooden pick inserted in the center comes out clean.  Cool slightly in the pan and then turn out onto a rack to cool completely.  Wrap in plastic and allow to stand overnight before cutting into layers.
 
Dice the pears in 1/2 inch pieces and set aside.  In a medium bowl whip the heavy cream together with the extracts until moderately stiff peaks form, adding powdered sugar to taste near the end.  Stir together cream cheese and powdered sugar to taste in a large bowl until smooth.  Carefully fold heavy cream into cream cheese until blended.  Reassemble the cleaned springform pan used to bake the cake. Cut the cake into three layers and place one layer into the bottom of the pan.  Sprinkle evenly with several tablespoons of the reserved pear juice.  Spread the layer evenly with half of the currant preserves and then with 1/4 of the cream mixture.  Sprinkle half of the diced pears evenly over cream.  Top with the second layer and repeat.  Sprinkle the third layer with several tablespoons of the reserved pear juice before placing on top.  Cover cake with plastic wrap and refrigerate, along with remaining cream, for 2 hours or until cream is set.  Carefully remove the cake from the pan and place on cake plate.  Frost with remaining cream.  You can get creative with piping and whatnot, but it's not necessary.  Chill for 30 before serving to allow cream to set slightly.
 
This is by far one of the best tasting cakes I have ever made, and I've been making cakes since I was 13 years old.  
 
*There are several cookbooks with this title.  I am referring to the one by Annette Wolter and Christian Teubner any time it is mentioned in any of my posts.
**I used a light colored pan, for a dark colored pan preheat oven to 350 degrees.
 

Thursday, June 16, 2011

Brain Food


A couple of months ago I made a command decision to quit attending the university that I was enrolled in so that I could switch to a small community college in my area.  I did this because the community college offered a degree in culinary arts and baking/pastry, and I've decided to stop fighting myself and finally get a degree in the area that I truly love, food.  

I had to chuckle about the whole enrollment process because not only did I have to provide an official high school transcript, but I also had to take COMPASS tests in reading, writing and math.  I graduated in 1988 and math wasn't my strong suit back then.  Now?  I know I've heard of polynomials and functions, but I have no idea what they do, or more importantly, what I'm suppose to do with them.

I finished the reading with a 96, the writing with a 99, and the math with an abysmal 51. *sigh*

I did try to bolster my brain power with burst of protein before hand and while it may not have worked, it was a damn tasty try.

Tuna Salad
5 ounce can tuna in olive oil, undrained
1/2 cup shredded extra sharp white cheddar
1/4 cup chopped sweet onion
1 tablespoon minced fresh parsley
1 tablespoon olive oil
salt 
pepper

Mix together all ingredients, except salt and pepper, in a medium bowl.  Add salt and pepper to taste.  Serve on the bread of your choice with fresh vegetables.

Monday, June 13, 2011

Coffee makes it possible to get out of bed. Chocolate makes it worthwhile.


Cake is a very touchy kind of thing for me.  See, I'm not a baker (no, really, it's a major weak spot in my culinary skill set).  I can whip up stews and soups and steaks and several other dishes that start with "s" at the drop of a hat, but baking is something that requires a lot of planning and sometimes a few tears.  However, since I have a massive sweet tooth I tend to do it often.  In my world "baking" is synonymous with "sweet".

Back to the cake thing.  I always bake cakes for my kids' birthdays and I let them choose which one they want.  It's easier than making one I think they would want and having it turn out to be one they wouldn't consider if they were starving.  Karina's birthday was a few weeks ago and her choice was chocolate cake with mocha frosting.  So I used the only chocolate cake recipe that has never failed me with a French butter cream icing.  It was tasty as hell, but ugly as sin....I also lack decorating skills.

Chocolate Sponge Cake (adapted from The Best of Baking)
6 eggs, separated
4 1/2 tablespoons lukewarm water
1/2 cup sugar
1 cup all purpose flour
1/2 cup unsweetened cocoa powder
1 1/2 teaspoons baking powder
1/8 teaspoon salt
1 tablespoon very finely ground espresso (optional)

Grease a 9-inch springform cake pan.  Preheat oven to 350 degrees.

Place the egg yolks, water and half the sugar in a medium bowl.  Beat with an electric mixer for 5 to 10 minutes or until pale and creamy.  Beat the egg whites until stiff and fold in remaining sugar.  Carefully fold egg white mixture into egg yolk mixture.  Sift the flour with the cocoa powder, baking powder, coffee and salt.  Fold into egg mixture.  Turn the batter into the prepared pan.  Smooth the surface and bake for 35-40 minutes or until a wooden pick inserted in the center comes out clean.  Cool slightly in the pan and then turn out onto a rack to cool completely.  Wrap in plastic and allow to stand overnight before cutting into layers.

French Butter Cream (adapted from The Best of Baking)
1 1/2 - 2 cups butter, slightly below room temperature
4 eggs
1 cup sugar
1 tablespoon very strong coffee
1/3 cup unsweetened cocoa powder
pinch of salt

Beat the eggs, sugar and salt in a medium bowl set over a saucepan of simmering water until very warm and thickened (I believe the temperature should be around 160 degrees).  Remove the egg mixture from the heat and continue beating until completely cooled.  Beat in the coffee and cocoa powder.  Beat in butter one tablespoon at a time until butter cream comes together smoothly.  If refrigerating butter cream, have it come to slightly below room temperature before using.

Friday, June 10, 2011

Creampuffs....Now With Chemical X


My mother comes from a small German town called Langmeil.  When she married my father and moved to the States she wasn't able to visit home often.  But whenever she did, my Oma's best friend, Frau Sapp (which I've probably spelled wrong), would always make cream puffs for her because they were a favorite treat.  Since I know this tidbit of information I always think of my mother, my Oma, Frau Sapp and Langmeil whenever I have cream puffs.  It's a very happy event.

What is odd about them is though they are incredibly easy to make, I very rarely make them.  Now that I've revisited them I think I'll be making them more often.

Frau Sapp went with a very simple sweetened whipped cream to fill hers and they were divine.  I went with Chantilly custard and we may have wept while eating them.  "I think the filling could live on it's own in a bowl", were the words of my best friend.  And thus we have found our Chemical X.

Cream Puffs
pate a choux:
1/2 cup butter
1 cup water
1 cup flour
4 eggs
pinch of salt

Chantilly custard:
2 cups whole milk
2 eggs
1/2 cup sugar
3 tablespoons cornstarch
1/2 teaspoon vanilla
pinch of salt
1 1/2 cups heavy cream
1/4 cup powdered sugar

Make the custard for the filling first as it has to cool completely in the refrigerator.  Put the milk in a medium saucepan and scald over medium heat.  In a medium bowl mix together eggs, sugar, cornstarch and salt with a whisk.  Once milk has reached temperature, take a ladleful and slowly whisk it into the egg mixture.  Repeat one more time.  Whisk tempered egg mixture slowly back into the remaining milk in the saucepan and cook until thickened.  Remove from heat, allow to cool for a minute and then whisk in the vanilla.  Pour into a bowl and put plastic wrap directly onto the surface of the custard.  Refrigerate until completely cooled.

Preheat oven to 350 degrees.  Line two backing sheets with parchment paper and set aside.  Bring butter and water to a boil in a medium sauce pan.  Pour the flour and salt into the boiling liquid all at once and mix vigorously with a wooden spoon until mixture forms a ball.  Remove from heat and allow to cool for about 5 to 10 minutes.  Mix eggs into the dough one at a time, making sure to fully incorporate each one.  Mixture should now be like a thick paste and glossy.  Using a two inch ice cream scoop, drop scoops of dough onto the prepared baking sheets, leaving about and inch or so between.  Bake for approximately 30 minutes, or until cooked through and lightly browned.  Cool completely either on the pans or on wire racks.

Complete the Chantilly custard by whipping the heavy cream to soft peaks and then whip in the powdered sugar until stiff peaks are formed.  Fold whipped cream into the cooled custard.  Slash open each puff to create a pocket and either spoon or pipe Chantilly custard into each one.  Dust with powdered sugar and serve.  Though they should be assembled right before serving, leftover cream puffs that have been stored in the refrigerator taste awesome as well.


Monday, May 23, 2011

Diamonds are a Girl's Best Friend


Best friends are awesome.  My best friend, April, is more awesome than most in my opinion.  No matter what, and I really do mean "no matter what", she has been and always will be there for me.

We try to get together once a week to sit around, talk and on occasion write on our perpetually changing book.  More often than not we meet up at my place which means that I get to cook up a storm for the two of us and we eat such things as red curry chicken and spaghetti bolognese at 9 o'clock in the morning.  If I can swing it, I really like to make something desserty to go with the meal.  Because how could that possibly be a bad thing?

Last week I made the beauties you see above.  In Serbian/Bosnian (Yugoslavian for me) they're called oblatne.  My oma, who was German by way of Hungary, called them oblaten, though strictly speaking oblaten in German are exceptionally thin edible wafers that go under cookies such as lebkuchen so that they don't stick to the pan when baking.  The treats above are wafer cookies that are very simple to make.  The wafers themselves come in packets of five and just about any filling that is spreadable can be put between them.  That's the only "hard" part, figuring out what you want to put in between; Nutella, pastry cream, peanut butter and jelly, marshmallow creme, et al.  The fillings that I know are the ones that my oma and mom made to put inside, chocolate with nuts and lemon with nuts.  I opted for the chocolate because Karina isn't chuffed with lemon and I knew April would not have any objection to anything with chocolate.

I got the recipe from my mother when we were up at her place for Christmas, she also gave me the packet of wafers, which she bought when she was in Germany.  They can be bought here in the states in stores specializing in Eastern European or German foods, or on the internet.  The internet option may be more viable if your local specialty store runs out of them as fast as they get them in, like mine.

Chocolate filled Oblaten
1 packet 18" x 11" (47cm x 29cm) wafers

filling:
6 eggs
2 1/2 cups powdered sugar
3/4 pound unsalted butter, room temperature
12 ounces bittersweet chocolate, chopped
1 1/2 cups nuts, finely ground (I use pistachios this time)

In the top of a double boiler whisk together eggs and powdered sugar until thick and pale yellow, and mixture reaches 160 degrees.  Remove from heat, add in butter and chocolate, and stir until completely incorporated.  Stir in ground nuts.  Mixture should be room temperature by this point, if not allow to cool to room temperature.  On the first wafer, smooth side down, spread 1/4 of the mixture evenly and thinly.  Place a second wafer on top with the smooth side down.  Spread 1/4 of the mixture over the second wafer and repeat two more times with remaining mixture and wafers.  Put plastic wrap on the top wafer and then lightly weigh down finished oblaten with a board.  Let oblaten sit for approximately 8 hours or over night.  Using a sharp knife trim ends from oblaten, cut into 2 inch strips using the wafer pattern as a guide, and then cut strips into diamonds or rectangles.

Tuesday, May 17, 2011

Devil in a Red Dress


Karina and I watched Throw Down with Bobby Flay over the weekend (we're not masochists, I swear) and Karina practically drooled when the cupcake throw down came on.  This rocker chick made red velvet cupcakes and I'm pretty sure Karina whimpered.  So I did a bad thing and said "hey, I can make those for you if you want".  To which she said "how about right now?  is right now good?".  And as you may have guessed already, I said "why yes, I can".  

Now, I, personally, am not fond of red velvet cake in general because every one I've ever tried tasted like a chemistry set.  But people on the show raved about these and I could tell that Karina really, really, really wanted to have one of them.  I searched up the episode and was happy to see a link to the recipe.  The only problem was, when I read the recipe I kind of urped in my mouth a little bit.  The amount of red food coloring was insane (2 1/2 tablespoons) and the amount of cocoa spartan (1 1/4 teaspoons).  The recipe for the frosting made my teeth hurt just reading it (2 pounds powdered sugar).  The only thing I could do was adjust the recipe to better suit what I thought should be in them.  

What I came up with wasn't a true red velvet cake, and since I added more cocoa it was leaning more toward devil's food, but still not quite that either.  Whatever you want to call them, they were amazing and delicious and I will certainly be making them again.

Red Devil Cupcakes
cupcakes:
2 1/4 cups flour
1 teaspoon baking soda
1/4 teaspoon salt
1/3 to 1/2 cup cocoa
1 cup sugar
3/4 cup buttermilk (I didn't have any buttermilk so I did the vinegar in the milk trick)
3/4 cup vegetable oil
2 eggs
1 teaspoon vanilla
1 to 2 teaspoons red food coloring

frosting:
8 ounces cream cheese, room temperature
1/2 cup unsalted butter, room temperature
1 teaspoon vanilla
pinch of salt
2 cups powdered sugar
sprinkles

Preheat oven to 350 degrees.  Grease, or line with muffin papers, a 12 cup regular cupcake pan or a 6 mega-cup cupcake pan (I have no idea what that is actually called, suffice it to say it's a cupcake pan that makes overly large ones). Mix dry ingredients for cupcakes together in a bowl.  Stir together wet ingredients in another bowl until well blended.  Add the wet mixture into the dry mixture and stir together until just combined.  Divide batter evenly in the cupcake pan.  Bake approximately 20 minutes, or until a toothpick inserted in one of the middle cupcakes comes out clean.  Cool in pan for 10 minutes and then transfer cupcakes to a wire rack to cool completely before frosting.

To make the frosting, cream together cream cheese, butter, vanilla and salt in a medium bowl with an electric mixer.  With the mixer on low, add the powdered sugar in small increments until fully combined.  Frost the cooled cupcakes and decorate with sprinkles.  

Monday, May 16, 2011

Keyser Söze


It's been a while since I posted anything about WoW, but since I got the Insane title, everything else seemed kinda low key.  Until now.

You're probably wondering what the post title has to do with what I'm working on in game.  Well let me tell you:  in The Usual Suspects, Verbal says "The greatest trick the Devil ever pulled was convincing the world he didn't exist."  And that applies to the WoW achievement Frostbitten.  This achievement has you trying to kill every silver rare in Northrend.  These guys only spawn a couple of times, sometimes only once, a day.  You have to fly around hoping to spot them and then gank them.  As you see below, I'm pretty well on my way to getting that.


What you don't really know yet is that the name at the top of the list, Loque'nahak, is a silver rare that is also tamable by hunters to use as their dpsing pet.  It's also the most desired by hunters of all the tamable silver rares out there.  

Now, I run and addon called SilverDragon that spams a macro to target silver rares for any given "country" I happen to by moseying along in.  Whether on foot or in the sky, I know if a silver rare is present, even if it's just its corpse.  My screen edge starts flashing red, a name plate pops up on my screen allowing me to target the rare, and I'm pretty sure there are sounds as well (not heard them myself since I play with my in-game sounds off...I like to listen to music, what can I say).  The information on which rares I've seen, how often and how long ago gets logged so I can cry over the times I missed a rare that I've needed because I was on a taxi, or the rare was already dead, or in the process of becoming dead due to the actions of another player.  I've run the addon for the past two years.  Want to know how many times I've seen Loque'nahak?

  
Yeah, you're seeing properly, 0.  Never.  Not once.  Not even as a rotting carcass.  You know why?  Because every hunter on the server camps the hell out of every spawn point for that damn cat.  Which brings me back to my comparison.  I think that the greatest trick Blizzard ever pulled was convincing players outside of hunters that Loque'nahak ever existed.  Seriously, just look at that.  I haven't even seen the other two rares in Sholazar.  Why?  Because as these hunters camp for Loque'nahak, they kill dead the other rares out of frustration.

I'm going to go and cry in a corner now. 

Sunday, May 15, 2011

The Drunken (Pork) Master


Sometimes you see things and think to yourself "huh, I'd have changed x, y or z".  That's kind of what happened to bring about this really, really, tasty pork stew that Karina and I had last week.  I was listening to Food Network (which I freely admit is evil, but some days there just isn't anything good on the gazillion other channels and those are the days you need background noise, but not just background-background noise, you need something with a bit of substance, and you know you can't pop The Hunt for Red October or the Star Trek reboot movie in the DVD player again else your child will revolt and you'll wake up bald or covered in honey or some other heinous thing....but I digress) and Ina Garten was making Beef Burgandy, a dish I love long time (I shall post mine some time in the future).  As she went on about what to do I thought to myself "self, you don't have beef in the freezer, but you do have those tasty pork chops that you won't actually make as pork chops" because I wouldn't have, trust me.  Even though they came from Jaworski's and their meat is always amazing.  Just not a fan of pork chops in a pork chop preparation.  

Anyway, I thought of the pork chops and then I thought "I bet they'd taste good as a stew braised in white wine and tossed over hot buttered egg noodles".  And you know what, they tasted even better.

And please forgive the photography.  I like to use natural light for pictures, but for some reason have yet to find optimal placement of my freezer (which I use for placing things on) to capture the light.  In addition I really need to invest in a tripod.  Also, I should probably read more about how to take good photographs.  I took about 15 shots of the finished dish and this was the best of them.  I should have checked them out before saying it was done and digging in to the stew.  Live and learn.

Pork Stew
marinade:
1 1/2 cups white wine (whatever makes you happy)
2 cloves garlic, peeled and just smacked with the back of a knife
1 tablespoon grey sea salt
1 1/2 tablespoons dried rosemary
2 small bay leaves
2 pounds lean pork, cubed

prep:
1/2 pound button mushrooms, quartered
1 large onion, large dice
2 tablespoons bacon drippings (or oil)
2 tablespoons olive oil
2 tablespoons butter
3 cups stock
1 cup white wine
grey sea salt to taste

binder:
2 tablespoons butter, melted
2 to 3 tablespoons flour

Combine all the marinade ingredients together in a gallon sized plastic bag, close it and then massage everything together.  Stick the bag in the fridge and let sit over night.

Next day take the pork out of the fridge and let it set at room temperature for about half an hour.  Preheat oven to 350 degrees.  Heat a large pot over medium high heat and add the bacon drippings.  When the drippings are spitting hot, add in the pork cubes, roughly drained (grab them with tongs and shake them off), in small batches to sear.  Remove the seared meat to a large casserole dish and continue until all the meat is browned.  Add the olive oil to the pan, reduce the heat to medium and toss in the chopped onion.  Sprinkle with a little sea salt and saute until translucent.  Remove onion to the casserole and add the butter to the pot.  When melted and hot toss in the quartered mushrooms and saute until just barely browned.  Remove mushrooms to the casserole.  Pour wine into the pot to deglaze, then add stock and bring mixture to a boil.  Taste for salt and add if needed.  Combine the melted butter and flour to make a cold rue.  Add to the boiling mixture and allow to thicken.  Taste for seasoning again and adjust if needed.  Pour over meat and vegetables in casserole dish, stir to combine, cover with foil and pop it into the oven for about an hour to an hour and a half.  When finished, remove from oven and serve over egg noodles.


Monday, May 9, 2011

One Potato, Two Potato, Three Potato Four


For whatever reason Mother Nature has, the weather here in Northern Indiana has been weird, even for us.  Last week it was cold to the point where we had several frost warnings and I ended up having to turn on the heater so we didn't sit around with chattering teeth.  And I don't know why I thought of it outside of "it's really effin' cold", but I kept dreaming about baked potato soup.  I've never made it before and I'm here to tell you I still haven't made it.  What you see above is a cream of potato soup and oh my god, was it delicious.  

Not sure why I didn't end up with a baked potato soup, but that's ok.  I'll be keeping this recipe on hand for a very long time.


Cream of Potato Soup
1/2 pound bacon, diced
2 tablespoons olive oil
1 large onion, diced
2 cloves garlic, coarsely minced
4 medium potatoes, peeled and diced
3 1/2 cups stock (whatever you have on hand, I used homemade meat stock)
3 to 4 cups mashed cooked potatoes
1 cup heavy cream
2 1/2 cups shredded white cheddar cheese
1 bay leaf
salt
pepper

Brown the bacon in a large stock pot over medium heat.  Remove with a slotted spoon and set aside.  Add the olive oil to the pot with the rendered bacon drippings and bring to heat.  Add in diced onions, minced garlic and diced potatoes.  Saute the vegetables for about 20 minutes, or until potatoes are almost done.  Add in the stock and bay leaf.  When the soup has come to heat, check for salt and add in if needed, to taste.  Bring to a boil and add in the mashed cooked potatoes.  Bring back to a boil, taste for salt and add if needed.  Turn heat down to low, stir in heavy cream and then the shredded cheese.  When cheese has melted, taste for salt and add, if necessary, with cracked black pepper to taste.  Stir in reserved bacon pieces.  Serve with baked potato skins or sour cream or both or whatever your heart desires.

Because I had planned on making a baked potato soup, I baked 5 large potatoes and had scraped them out to make baked potato skins to go with the soup.  I used the scraped out insides to thicken my soup, but you can boil and mash up some potatoes to do this instead or even use leftover mashed potatoes.

Friday, April 29, 2011

chili, chilly, chilli, Chile


Many moons ago I had a cooking site on livejournal.  It was a good site and I enjoyed posting to it.  Over the years I lost touch with the people there and stopped posting, partly because I lost interest in social networking sites but mostly because my personal life became complicated as hell and I stopped doing a lot of things in general.

Since I'm going through a bit of a dry spell with my cooking at the moment I thought I'd go back to that site and re-post some of the recipes here.  The first one up is my Cincinnati Chili.  It's really easy to make and tastes like a dream.  

Cincinnati-ish Chili
4 cups water
3 - 8 ounce cans tomato sauce
1 - 14 1/2 ounce can stewed tomatoes
1 tablespoon Worcestershire sauce
2 large onions, chopped
3 teaspoons garlic, minced
3 bay leaves
3 tablespoons chili powder
2 tablespoon unsweetened cocoa powder
1 teaspoon ground black pepper
1 teaspoon ground cumin
1 teaspoon ground allspice
1 teaspoon ground cinnamon
1/4 to 1/2 teaspoon ground cayenne
2 pounds beef, finely ground
salt

Stir all ingredients, except ground beef and salt, in a large pot and bring to a simmer over medium heat.  Add ground beef and stir with a wooden spoon to break up.  Turn heat to medium-high and boil until ground beef is cooked thoroughly.  Lower heat to medium and simmer for 2 to 3 hours, stirring occasionally.  Add salt to taste.  Serve with the traditional accompaniments of spaghetti, kidney beans, onions and huge mounds shredded cheddar cheese.  Oyster crackers could be served on the side and if you're feeling really non-traditional you could dollop on some sour cream, because it's yummy....really, really, yummy. 

Make sure the ground beef is as finely ground as possible.  You can get it this way from a good butcher.  When you put it into the liquid mixture while it is raw and break it up with a spoon, it should almost homogenize.  I know, sounds weird, but it makes for a very smooth chili.  Also note that this chili is thin, not thick, like a marinara sauce.  If you can hold out I would suggest putting the whole pot into the refrigerator and eating it the next day.  As with most stews and soups, it truly is better after sitting for a good 24 hours. 

Serving suggestions:
2-Way:  chili served over spaghetti
3-Way:  chili served over spaghetti topped with copious amounts of shredded sharp cheddar
4-Way:  chili served over spaghetti topped with chopped onions and then copious amounts of sharp cheddar cheese
5-Way:  chili served over spaghetti topped with kidney beans, chopped onions and copious amounts of sharp cheddar cheese

Thursday, April 14, 2011

I Control the Spice, I Control the Universe


The other night I was feeling like having beef.  And not the ground kind.  I wanted a slab of meat that would make a t-rex weep with joy.  Unfortunately, all my beef was frozen solid.  So I did what any self-respecting carnivore would do; grabbed a 3 pound chuck roast in it's solid state, doused it with some stuff in a baking pan, tin-foiled it to death and threw it in the oven.  Several hours later I had spicy beefy......spicy beef you would run over your grandmother to get to, trust me.  Not that I advocate running over grandmas, that's Santa's job.

Spicy Beef
3 pound chuck roast
7 ounce can chipotles in adobo sauce
8 ounce can tomato sauce
1 1/2 large onions, sliced
1/4 cup Worcestershire sauce
12 ounce bottle dark beer
kosher salt
freshly ground black pepper

Preheat oven to 375 degrees.  Place frozen roast in a 9 x 13 deep baking pan.  Salt and pepper to taste on both sides.  Place sliced onions all around the roast.  Drizzle the meat and onions with the tomato sauce, Worcestershire sauce and beer.  Toss a little more salt over the top of the roast since you washed it away with the beer.  Now add the chipotles.  If you're very brave and love very hot-spicy, add the entire can in addition to the adobo.  If you're not so brave or just prefer to keep your taste buds intact, add as many of the peppers as you wish along with a bit of the adobo.  Cover the whole pan tightly with tin foil and shove it into the oven.  After an hour, turn heat down to between 325 and 350.  Cook for two more hours.  Allow beef to cool a bit, shred it up and set aside.  Skim the excess fat off the pan sauce, pass the sauce through a strainer and pour over shredded beef.  Serve over pasta or rice, in a sandwich or tortilla, or maybe just stand there and eat pieces out of the serving bowl.  Oh, and it's also divine with a dollop of sour cream to cool some of the heat.